What is OData?
OData (Open Data Protocol) is an OASIS standard which defines a standard for creating and consuming RESTful APIs. OData is an popular means of defining services as it provides a unified way of accessing various Data Sources.
Why use OData?
OData can be used to expose various Data Sources and provides a seamless integration format for data exchange. In the age of cloud and mobile services OData provides simple, scalable and highly optimized data service as in nature it defines a REST service. It supports both JSON and XML format and can be used to perform CRUD actions.
Content
In this blog we will cover following topics:
- Database Preparation
- Build a Dynamic Web Project
- Connecting Eclipse to PostgreSQL database
- Create JPA from Table Entities
- Expose Database Tables as OData using Apache Olingo
- Testing OData services using Postman
- Deploy and Release
- Database Preparation
Login to pgAdmin, create database ”use any name”.
Follow below SQL scripts to create Table ”Customers”, ”Orders” and ”Products”


After performing above scripts, Database will look as below.

Execute below sample SQL Scripts to insert sample data to respective Tables.


- Build a Dynamic Web Project
Open Eclipse, select File à New à Dynamic Web Project

- Enter ProjectName something as ”service-list”.
- In Target runtime, click on New Runtime or existing Runtime as ”Apache Tomcat vX” selected below.
Note: In the interest of the audience and to keep this blog short we will not cover configuring Apache Tomcat in detail.

- Once Target Runtime is selected, click on Modify and on the next screen select JPA (Java Persistence API) , Click OK.

- On Next screen , Select ”EclipseLink 2.5.x” under Platform.
- Select ”Disable Library Configuration” under JPA implementation.
- Under Persistent class management select ”Annotated classes must be lsited in persistence.xml”, Click on Next.

- On Next screen select checkbox ”Generate web.xml deployment descriptor”, Click on Finish

Once project is created, it will appear in Explorer window .
Since there are external dependencies we need to uplaod corresponding JAR files to project Build.
To Add dependencies Go to your HOME directory Eclipse Workspace àProject à WebContent/WEB-INF/lib and add additional JAR files.
Note: Due to missing JAR’s project will show error, after applying dependencies, Click on Project–>Clean this will revalidate project folder and final project structure will show as below

- Connecting Eclipse to PostgreSQL database
- To create connection to Database, Go to Windows -> Show View -> Data Source Explorer
- Select ” Data Source Explorer”, Right click on “Database Connection” and click on “New”
- Input connection details , Test connection and once Ping is successfull Click Finish

- Data Source Explorer will show as below with access to Tables and Schemas

- Create JPA from Table Entities
- To create JPA model based on Tables, go to File –> New –> Other –> JPA Entities from Tables and click on Next

- Select existing Datbase connection as defined in previous step under ”Connections” tab
- Select list of tables that are required for Entities
- Check List generated classes in persistence.xml

Click Next
On next Popup screen select option ”Always generate optional JPA annotations and DDL parameters”
Here you can define package name , you can define any name here, Click Finish
Note: As per best practices it should be ProjectName.OrganizationName.Model

This will create JAVA classes under Preoject src folder as JPA Model entities.

- Bind Data connection to project
Open file “persistence.xml” and select tab “Connection”
Under Transaction type Select ”Resource Local”
Establish connection by selecting ”Populate from connection”
Note: This will auto populate Driver and Conection entries, once done simply click Finish

- Expose Database Tables as OData using Apache Olingo
To expose JPA entities defined for our Database Tables as OData we will use Apache Olingo library
In order to achieve this , we will be performing primarily 3 activities :
- Create JAVA class in main package and extend ODataJPAServiceFactory
Here, we have created JAVA class ServicesListPool and extended ODataJPAServiceFactory
Note: Below code snippet suggest how this can be achieved

- Update web.xml and add Servlet information

- Create HTML file to WebContent
Select WebContent , Right click New à HTML File

HTML file will contain reference to Service

- Testing OData services
We can test newly genearted OData service in various ways.
- Using Postman, SOAPUI or any other native client
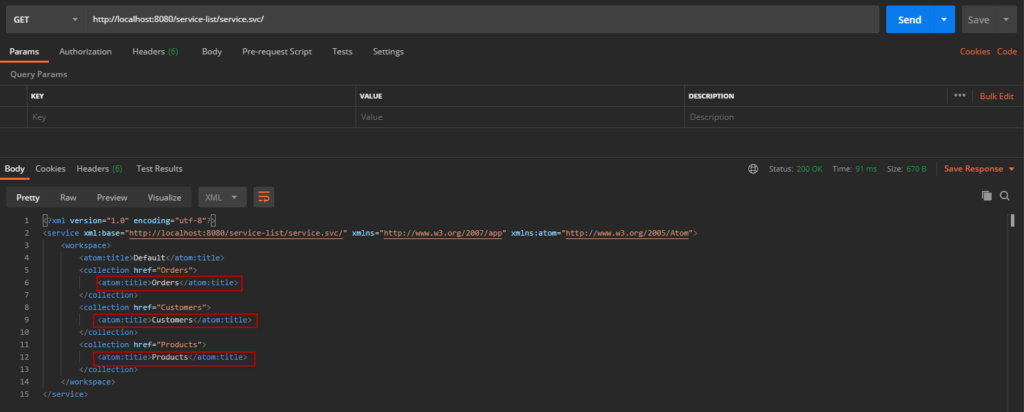
We can call OData endpoint as https://{hostname}:{portname}/{service definition} via Postman, since we are not passing any parameter we will use GET
This will display list of collections (one each for selected Table)

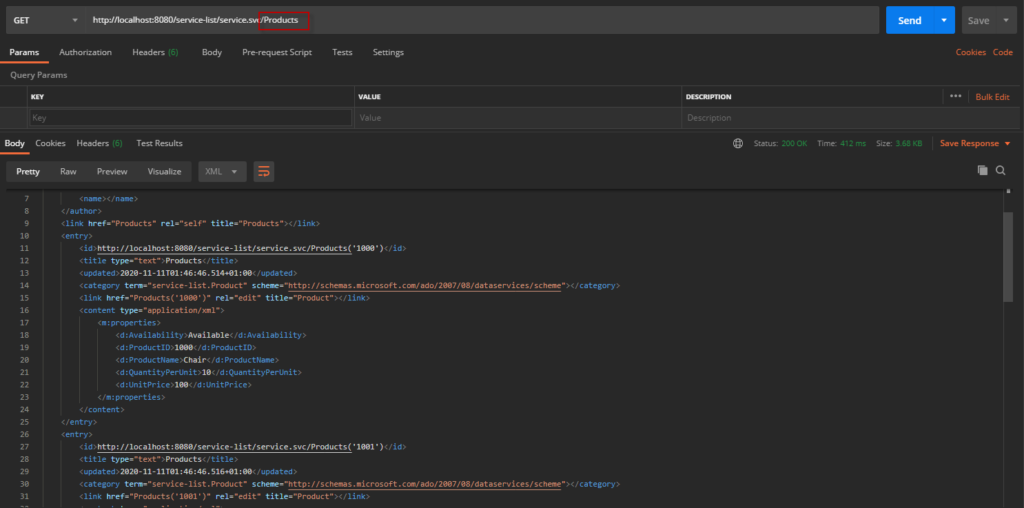
In order to calling a selective collection, just append above endpoint with colection name
Note: In below example we are calling Products service

- Browser Same OData endpoint can be opened in browser
- Eclipse
Eclipse provides Developers with easy option to test changes
To test created OData service ,Select project Right Click à Run As à Run on server
- Deploy and Release
We can export our project as WAR and deploy our services to hosting so they can be accessed publically.
Select Project node, Right Click àExport àWAR file
Provide Name and Destination of the file to export, once export is done same WAR file can be deployed on any server for hosting.
Note: In order for OData services to work underlying Database server should also be availble to the services

Conclusion – With this blog we have demonstrated how we can create OData services using JAVA and Apache Olingo exposing our database tables.


