Dependencies
- First check if you are having x86 or x64 Linux Ubuntu Architecture.
- User account has sudo privileges to run following commands.
Download JAVA Installation file
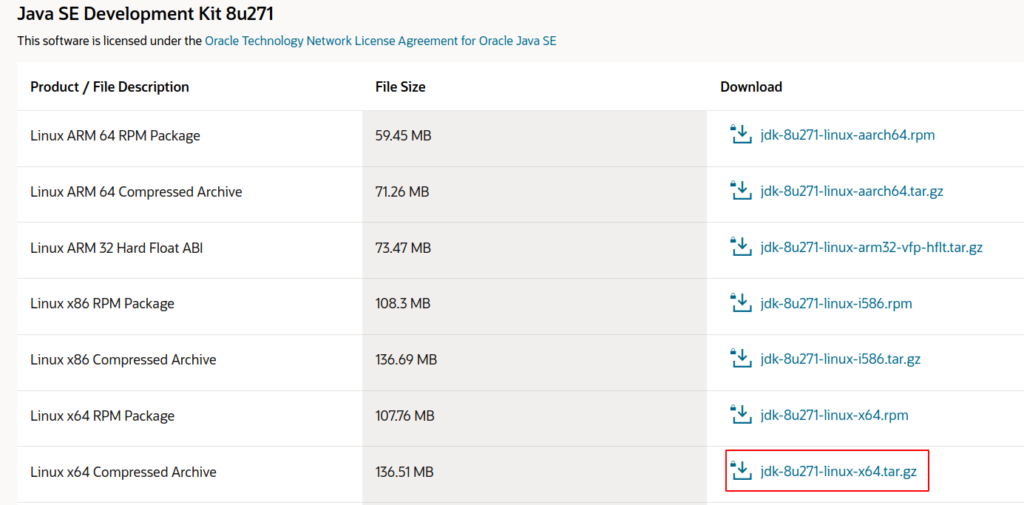
- Go to Oracle Official website here “https://www.oracle.com/java/technologies/javase/javase-jdk8-downloads.html “for Oracle Java 8 JDK download and select JDK version appropriate for your Linux Architecture and Type.
Note: At the time of writing this document Oracle’s Java JDK version available is 1.8.0_271.
As we are going to install JAVA on our Ubuntu machine, we choose “Linux x64 Compressed Archive” for download.

- Click on Filename to Download.
- On the Next screen Select Checkbox to accept Oracle’s License Agreement.
- Provide Login details on the following screen or create account to begin download.
Note: In most cases file will be downloaded to your users Download folder
Installation
- Open Terminal and create a folder under /usr/lib directory for JAVA files using below command


If the directory does not exist above command will create one folder under /usr/lib

- Change your working directory to /usr/lib/jvm by using below command

- Extract the downloaded JDK file using below command


Note: Above command presume the files is downloaded in Download folder and the downloaded version is 271.
Set the Environmental variable
- Open Environment file for Edit using command


- This command will open up Environment file for EDIT.

- Add these environment variables at the end of the file
- J2SDKDIR=”/usr/lib/jvm/jdk1.8.0_271″
- J2REDIR=”/usr/lib/jvm/jdk1.8.0_271/jre”
- JAVA_HOME=”/usr/lib/jvm/jdk1.8.0_271″
- DERBY_HOME=”/usr/lib/jvm/jdk1.8.0_271/db”
Note: Environment file will look as below after adding environment variables

- SAVE changes and Exit edit to environment file
Update system properties to use newly installed JAVA
Run below commands this will update system properties and update system of the location of install files and directories.


- Restart the system or sign out of the user session
Verify Correct version of JAVA 8 JDK/JRE is installed.
- Open Terminal and type below command to validate correct JAVA version is displayed


After running this command if you get message as installed version of java then your installation in correct. Although the steps for installing JAVA on Ubuntu 20.04 are fairly simple, certain users might run into errors it is good to revisit the steps as mentioned in this tutorial for troubleshooting purpose and


